1. Corn Light Basics: Key Knowledge Before Purchase
Understanding core concepts avoids wrong selections and installation failures.
1.1 Corn Light Types & Application Scenarios
Corn lights vary by base type, power, and use case-match them to your space:
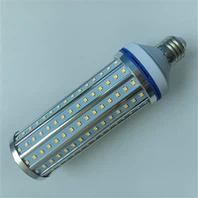
E26/E27 Base Corn Lights: Universal screw-in design, ideal for residential garages, small workshops, and retail display cases (10W–50W).
E39/E40 Base Corn Lights: Large industrial base for warehouses, factories, and high-bay areas (50W–200W).
Plug-and-Play Corn Lights: No wiring needed, suitable for temporary spaces or quick upgrades (battery-powered or USB-enabled).
Choose based on space size (small rooms = low wattage; large warehouses = high power) and existing fixtures (match base type to avoid adapter hassle).

1.2 Core Technical Parameters for Corn Lights
Key specs directly impact brightness, energy efficiency, and durability:
Lumen Output: Measured in lumens (lm)-10W = 1000–1200lm (small spaces); 100W = 10,000–12,000lm (large areas).
Colour Temperature (CCT): 3000K (warm white) for residential; 5000K (cool white) for workshops/warehouses (better visibility).
CRI (Colour Rendering Index): ≥80 for accurate colour perception (critical for retail or detailed work).
IP Rating: IP44+ for damp areas (garages); IP65+ for outdoor or dusty environments (warehouse exteriors).
Lifespan: LED corn lights typically last 50,000+ hours (5x longer than incandescent bulbs).
1.3 Power Supply & Voltage Compatibility
Avoid burnout with proper power matching:
Voltage: 120V/240V (standard household/commercial); confirm your grid voltage before purchase.
Wattage vs. Energy Savings: LED corn lights use 80% less energy than incandescent-e.g., a 20W LED replaces a 100W incandescent.
Dimmability: Check if the corn light is dimmable (look for the "dimmable" label) and compatible with your dimmer switch (LED-specific dimmers recommended).
2. Corn Light Installation: Step-by-Step Guide
Corn lights are designed for easy installation-follow these steps for safety and optimal performance.

2.1 Pre-Installation Preparation
Safety First: Turn off the power at the circuit breaker; verify with a voltage tester to avoid electric shock.
Tool List: Screwdriver (for base removal), voltage tester, gloves (for handling fixtures), and silicone sealant (for outdoor installation).
Fixture Check: Inspect the corn light for damage (cracks, loose LEDs) and ensure the base matches your existing socket.
2.2 Standard Installation Steps
Remove Old Fixture: Unscrew the old bulb/lamp from the socket-for industrial E39/E40 bases, use a socket wrench if tight.
Clean Socket: Wipe the socket with a dry cloth to remove dust or debris (prevents poor contact).
Install the corn light: Screw the corn light into the socket clockwise-hand-tighten only (over-tightening damages the base).
Seal (Outdoor Use): Apply silicone sealant around the base to prevent water/dust ingress (for IP65+ models in damp areas).
Test Run: Turn on the power and check brightness-adjust the dimmer (if applicable) to the desired level.
2.3 Installation Safety & Compliance
Follow local electrical codes (NEC, IEC)-never install in wet locations without waterproof fittings.
For high ceilings/industrial areas, use a ladder or lift (never stand on unstable surfaces).
Avoid touching LED chips directly (oil from skin shortens lifespan) - wear gloves during installation.
3. Corn Light Troubleshooting: Common Issues & Solutions
Quickly resolve problems to minimise downtime and maintain lighting quality.
3.1 Troubleshooting Flowchart
Follow this logic for efficient diagnosis:
No light → Check power supply → Inspect socket contact → Test corn light in another socket.
Flickering → Verify dimmer compatibility → Tighten base connection → Replace faulty driver.
Dim Brightness → Clean LED chips (dust accumulation) → Check voltage drop → Replace ageing fixture.
Overheating → Ensure proper ventilation → Reduce wattage (if overloaded) → Check for blocked vents.
3.2 Top 4 Common Faults & Fixes
|
Fault |
Causes |
Solutions |
|
No Light |
Power outage, loose base, faulty driver |
Reset circuit breaker, re-tighten the base, and replace driver (if under warranty) |
|
Flickering |
Incompatible dimmer, voltage fluctuation |
Use an LED-specific dimmer and install a voltage stabiliser. |
|
Dim Output |
Dust on LEDs, low lumen rating, voltage drop |
Clean with dry cloth, upgrade to higher-lumen model, thicken wiring |
|
Short Lifespan |
Overheating, poor-quality driver, wet environment |
Improve ventilation, choose branded fixtures, use waterproof models outdoors |

4. Corn Light Accessory Buying Guide
High-quality accessories enhance performance, safety, and convenience.
4.1 Core Accessories Selection
Dimmer Switches: Choose LED-compatible dimmers (avoid incandescent dimmers) for adjustable brightness-ideal for retail or residential spaces.
Socket Adapters: Convert E26/E27 to E39/E40 (or vice versa) for fixture compatibility-no need to rewire sockets.
Waterproof Covers: For outdoor/damp areas (even IP65 models) - add a cover to extend lifespan by preventing moisture build-up.
Surge Protectors: Protect corn lights from power spikes (common in industrial settings) - select a 15kV+ surge rating.
4.2 Procurement Tips
Prioritise energy efficiency: Look for ENERGY STAR or DLC certification (ensures 80%+ energy savings).
Balance cost and quality: Branded corn lights (e.g., Philips, Cree) have better drivers and warranties (5–10 years) vs. cheap knockoffs.
Match to use case: For dusty warehouses, choose sealed LED chips; for retail, prioritise high CRI (≥90) for product display.
5. Corn Light Maintenance: Extend Lifespan & Performance
Regular maintenance keeps corn lights operating at peak efficiency and reduces replacement costs.
5.1 Routine Maintenance Schedule
Monthly: Inspect for loose bases, dust accumulation, and physical damage (cracks and loose LEDs).
Quarterly: Clean LED chips with a dry, non-abrasive cloth (dust blocks light output and causes overheating).
Annually: Test brightness (compare to new) and assess for driver degradation (flickering, dimness).
Every 5 years: Replace ageing fixtures (even if functional-LEDs lose 30% brightness over 50,000 hours).
5.2 Lifespan Extension Tips
Avoid frequent on/off cycles (shortens LED lifespan) - use motion sensors for low-traffic areas (garages and storage rooms).
Keep fixtures away from direct heat sources (heaters and furnaces) - overheating damages drivers.
Use voltage stabilisers in areas with unstable power (industrial zones) - this prevents driver burnout.
6. FAQ: Common Questions About Corn Lights
Q1: Can corn lights replace metal halide bulbs directly?
A1: Yes-match lumen output (not wattage) and base type; a 50W LED corn light replaces a 250W metal halide.
Q2: Are corn lights suitable for outdoor use?
A2: Yes-choose IP65+ models; add a waterproof cover for coastal or rainy areas.
Q3: How to calculate the right wattage for my space?
A3: Aim for 100–150 lumens per square foot-e.g., a 500 sq ft garage needs 50,000–75,000 total lumens.
Q4: Do corn lights require a ballast?
A4: No-LED corn lights have built-in drivers; bypass or remove old ballasts when replacing fluorescent/metal halide fixtures.
Conclusion
Corn light success relies on three core steps: choose the right type/parameters, install safely, and maintain regularly.
By following this guide, you'll enjoy bright, energy-efficient lighting that lasts 50,000+ hours, cutting electricity costs by 80% vs. traditional bulbs. For custom recommendations, bulk procurement advice, or technical support, contact our team-ideal for warehouses, retail stores, and residential spaces.