
Introduction: The Economics of Outdoor Illumination
The Hidden Costs of Traditional Grid-Tied Lighting
For most property owners, the true cost of outdoor lighting is not the fixture itself, but the infrastructure required to power it. Extending the electrical grid to a yard, driveway, or remote outbuilding requires trenching, laying conduit, pulling wire, and hiring a licensed electrician. These labor and material costs can easily exceed several thousand dollars-often ten times the cost of the light fixture. Furthermore, the homeowner is perpetually subjected to monthly utility bills and the inevitable maintenance costs associated with wired systems.
The Solar Advantage: A Paradigm Shift
All-in-one solar street lights disrupt this economic model entirely. By integrating monocrystalline photovoltaic panels, lithium battery storage, and high-density LED matrices into a single, self-contained unit, they operate completely off-grid. They require zero wiring and generate zero electric bills. However, the market is flooded with cheap, underperforming options. The challenge for the modern consumer is distinguishing between a high-quality, long-term investment and a "budget" product that will fail within months.
The Objective: Strategic Budgeting for Maximum Value
This paper serves as a consumer's strategic guide. "Breaking the bank" does not mean buying the cheapest product; it means suffering from buyer's remorse due to poor performance or premature failure. By understanding the core components of a solar light, you can allocate your budget where it matters most, ensuring you purchase a fixture that perfectly matches your yard's requirements while delivering decades of reliable, zero-cost service.
Core Component Analysis: Where Your Money Should Go
The Photovoltaic Panel: Monocrystalline vs. Polycrystalline
The solar panel is the engine of the system.
When evaluating a solar light, always prioritize monocrystalline panels over polycrystalline. Monocrystalline cells are cut from a single silicon crystal, giving them superior electron mobility. They boast a higher conversion efficiency (often 20% to 25% compared to 15% for polycrystalline) and perform significantly better in low-light conditions and high temperatures.
Because they are more efficient, monocrystalline panels require less surface area to generate the same wattage. The high-quality units referenced in this guide utilize large monocrystalline arrays, ensuring that even during the shorter days of winter, the system can achieve a full charge within the 6 to 8 hours of available sunlight.
Battery Storage: The Key to Overnight Endurance
The battery determines how long the light will operate after the sun goes down. The standard for modern, premium solar lights is Lithium Iron Phosphate (LiFePO4) or high-grade Lithium-Ion.
A high-quality unit must balance energy intake and output. The internal battery management system (BMS) must be capable of storing enough energy from a 6-8 hour daytime charge to power the LEDs for a continuous 8 to 10-hour nighttime discharge. Cheaper batteries will degrade rapidly, losing their capacity after just a few hundred charge cycles. Investing in a light with a robust lithium battery ensures longevity.
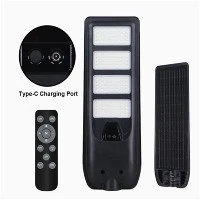
A critical feature to look for to protect your investment is a Type-C charging port. This allows you to bypass the solar panel and charge the light directly from a USB wall adapter or power bank. In extended periods of bad weather (e.g., a week of heavy rain or snow), this port guarantees that your security lighting never fails, providing immense peace of mind for a marginal manufacturing cost.
The LED Matrix and Sizing: Matching Power to Your Yard
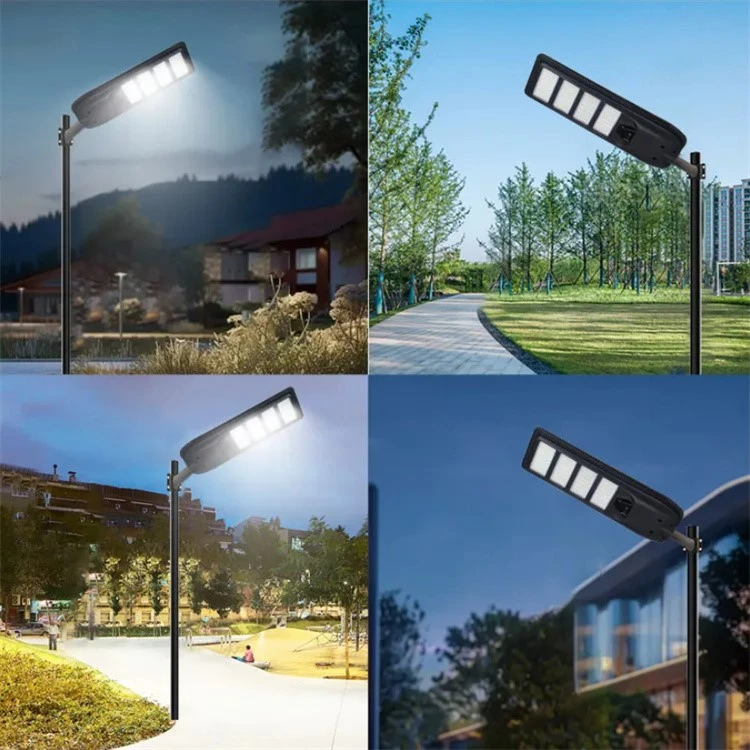
Lumens dictate brightness. However, raw lumens are useless if the light is concentrated in a narrow beam. The multi-panel LED architecture (available in 2, 3, 4, and 5-panel configurations) solves this by distributing the LEDs across a wider surface area.
This is where budgeting meets practical application. There is no need to overpay for the largest model if your yard is small.
2-Panel (1,000-1,500 lumens): Ideal for small patios, garden sheds, and side doors. Mount at 10-15 feet.
3-Panel (1,500-2,500 lumens): The budget-friendly sweet spot for standard driveways and medium yards. Mount at 15-20 feet.
4-Panel (2,500-3,500 lumens): For large rural driveways, expansive yards, or small commercial lots. Mount at 20-25 feet.
5-Panel (3,500-5,000+ lumens): The flagship powerhouse for expansive country roads, intersections, or large agricultural barns. Mount at 25-30 feet.
Materials and Weatherproofing: The IP65 Standard
To protect your financial investment, the light must survive the elements. A minimum of IP65 waterproofing is required. The "6" ensures the housing is entirely dust-tight (preventing dust from degrading the LED output). The "5" ensures protection against low-pressure water jets from any direction (rain, snow, sprinklers). Cheaper lights with IP44 ratings will inevitably fill with moisture and short-circuit.
The Smart Features: Enhancing Convenience and Savings
The Dusk-to-Dawn Photocell
A high-quality solar light must have a smart light sensor. This photocell automatically detects ambient light levels. It turns the light on at dusk and off at dawn, ensuring no energy is wasted and no manual intervention is required. This "set and forget" automation is a hallmark of a premium product.
The Multi-Function Remote Control
The inclusion of a dedicated remote control is a significant value-add that drastically extends the operational life and utility of the light. With the remote, you can:
Adjust Brightness (+/-): Dim the light to 30% for ambient lighting during a patio party, saving battery for later in the night.
Set Timers (3H, 5H, 8H): Set the light to run at 100% brightness for the first 5 hours, then switch to a lower power mode. This customizability ensures the light adapts to your specific lifestyle needs.
Manual Override: Turn the light on during the day for immediate security or maintenance needs.
Installation Strategy: Maximizing Your Savings
The 10-Minute DIY Installation
The most effective way to "not break the bank" is to avoid professional installation fees. All-in-one solar lights are designed for DIY mounting. They come with adjustable metal brackets that can be secured to a wall, wooden post, or metal pole using screws or hose clamps.
To get the most out of your investment, the installation location must be chosen strategically. The solar panel must receive unobstructed sunlight during the peak hours of 10 AM to 2 PM. Even a small shadow from a tree branch or roof overhang can reduce charging efficiency by up to 50%. If a shaded installation is unavoidable, the Type-C charging port becomes an essential tool to top up the battery.
Optimal Tilt Angles
For maximum solar harvesting, the panel should be angled to face the equator (South in the Northern Hemisphere). As a rule of thumb, tilting the panel to an angle roughly equal to your local latitude will optimize energy generation throughout the year.
Calculating the Total Cost of Ownership (TCO)
The Upfront Cost
The initial purchase price is the most visible cost. However, it is crucial to understand that a $30 "bargain" light that fails in six months is far more expensive than a $100 high-quality light that lasts for five years.
The Operational Savings
When calculating TCO, factor in:
Electricity: $0.00 (Solar powered).
Labor: $0.00 (DIY installation).
Maintenance: Virtually $0.00 (No bulbs to replace, 25,000-hour LED lifespan).
Reliability: The peace of mind knowing the light will automatically turn on every night.
Conclusion: Smart Buying Equals Long-Term Value
The Definitive Checklist
Choosing the best solar street light without breaking the bank requires a shift in focus from the initial price tag to the long-term value. Prioritize these key elements:
Monocrystalline Solar Panel: For maximum charging efficiency.
High-Capacity Lithium Battery: To guarantee the 8-10 hour overnight operation.
Type-C Charging Port: The ultimate failsafe for bad weather.
IP65 Waterproofing: To ensure durability against the elements.
Multi-Panel Sizing: Match the lumens to your yard size (2, 3, 4, or 5 panels).
Remote Control: For customized dimming and timer settings.
Final Verdict
By investing in a high-quality, all-in-one solar street light, you are permanently eliminating the hidden costs of traditional lighting. You bypass the trenching, the wiring, the electricians, and the monthly utility bills. You are purchasing energy independence.
How To Cooperate With Us?
We are happy to have total control over the manufacturing process and the calibre of our products since we have our own facilities. Since we are producers rather than just brokers, we are dedicated to providing our customers with the best pricing. Since we are certain that the price and quality of our products are clear, we invite customers to see our samples first. Our commitment to quality and customer satisfaction drives us to continuously provide top-notch goods.
Our address
3rd Floor, 5th Building, Hebei Industrial Park, Hualian Community, Longhua District, Shenzhen, China