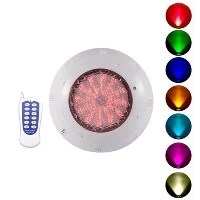

Swimming pool lighting has moved a long way from the single white bulb behind a glass lens. RGB LED pool lights let owners shift the mood of an entire pool with a remote or an app - deep blue for a quiet evening swim, a rotating color cycle for a party. But the visual payoff only shows up if the light is installed correctly. A poorly sealed niche or a mismatched transformer can turn a nice feature into a leak or, worse, a safety hazard.
This guide walks through the installation process step by step, from selecting the right niche to final testing. It's written for pool builders, electricians, and distributors who want a clear reference to share with installation teams or customers.
Confirm Niche Type and Light Compatibility
Not every RGB LED light fits every niche. Before ordering or shipping product, confirm whether the pool has a wet niche (the light sits behind a sealed lens, submerged in water) or a dry niche (the fixture stays out of direct water contact, common in fiberglass or vinyl-liner pools). Concrete pools almost always use wet niches; vinyl and fiberglass pools vary by manufacturer.
Measure the niche diameter and depth against the light's housing dimensions - a few millimeters of mismatch is enough to cause installation problems on site. If you're supplying lights to a distributor or contractor, it's worth sending a dimension drawing along with the product so their team can double-check compatibility before the pool shell is poured or the liner is fitted.
Check Electrical Requirements Before You Start
Most RGB LED pool lights run on low-voltage power (typically 12V or 24V AC/DC), stepped down from mains voltage by a dedicated transformer. This isn't optional - it's a safety requirement in nearly every plumbing and electrical code that covers pool lighting.
A few things worth confirming before installation begins:
The transformer is rated for the total wattage of all connected lights, with some headroom rather than running at full capacity.
The circuit is protected by a Ground Fault Circuit Interrupter (GFCI/RCD), which cuts power immediately if current leakage is detected.
Local electrical codes are followed for conduit routing, junction box placement, and minimum distance from the pool edge.
This is also the point where it makes sense to bring in a licensed electrician if one isn't already on the job. Pool lighting sits at the intersection of water and electricity, and cutting corners here isn't worth the risk.
Prepare the Pool Wall Niche
If the pool shell is still under construction, the niche should be installed and plumbed with conduit before the concrete is poured or the liner is set. The conduit run connects the niche to a junction box positioned above the maximum water level, usually at least 12 inches (30 cm) above the pool's high-water line, depending on local code.
For retrofits - replacing an old light in an existing pool - check the condition of the existing niche and conduit. Corrosion, cracked gaskets, or a collapsed conduit run are common on older installations and should be addressed before the new fixture goes in, since fixing them later means draining the pool again.
Run and Connect the Wiring
Feed the low-voltage cable from the junction box through the conduit into the niche. A few practical points make this step go smoother:
Leave enough slack cable at the niche so the light can be pulled out of the water for future maintenance without disconnecting wiring.
Use waterproof wire connectors or heat-shrink butt connectors at every splice - standard wire nuts are not rated for underwater or damp environments.
Match polarity and wire color coding carefully, especially on multi-light installations where several fixtures share one transformer and controller.
Double-check every connection before moving to the next step. Once the light is sealed into the niche and the pool is filled, re-opening a bad splice means draining water again.
Mount and Seal the Light Fixture
Slide the light fixture into the niche and secure it with the mounting screws provided. The face of the light should sit flush with the niche opening, and the gasket or O-ring between the fixture and the niche needs to seat evenly all the way around - this is the seal that keeps pool water out of the electrical housing.
A light coat of silicone-based lubricant (not petroleum-based, which can degrade rubber gaskets) on the O-ring helps it seat properly and makes future removal easier. Tighten mounting screws evenly in a cross pattern, similar to how you'd torque lug nuts on a wheel, rather than fully tightening one side before moving to the next.
Connect the Controller and Set Up RGB Modes
RGB pool lights are typically operated one of three ways: a wired wall controller, a wireless remote, or a smart home/app-based controller communicating over Wi-Fi or Bluetooth. Connect the controller according to the wiring diagram supplied with the product, matching data and power lines carefully - RGB fixtures usually carry an extra signal wire beyond the standard positive/negative pair used on single-color lights.
Once wired, power on the system and cycle through the preset color modes before closing everything up. This confirms the controller is communicating correctly with the fixture and catches wiring mistakes while the niche is still accessible.
Test the Installation Before Filling the Pool
Before the pool is filled, run a full function test: power on the light, cycle through colors and modes, and check the GFCI trips and resets correctly. Inspect the niche seal one more time for any gaps.
Once the pool is filled and the light is submerged, check again for moisture inside the fixture housing after the first 24–48 hours of operation. Early detection of a seal issue is far easier to fix than discovering a problem months later.
Summary
Installing an RGB LED pool light comes down to getting a handful of details right: matching the light to the correct niche type, following low-voltage and GFCI safety requirements, sealing every connection against water, and testing thoroughly before the pool is filled. None of these steps are complicated on their own, but skipping any one of them is usually where leaks, flickering lights, or electrical faults come from later.
https://www.benweilight.com/professional-lighting/waterproof-stainless-steel-rgb-underwater-led.html