Announcements
1. Please use the product according to the rated voltage remarked on the package, do not use it under the state of too high or too low voltage.
2. Before installing and replacing the lamp, the power supply must be cut off to ensure personal safety.
3. For safety, please entrust electrical professionals to operate the maintenance and inspection. Non-professional operations are prone to danger
4. The LED tube cannot be used in places with dimming lighting places.
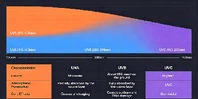
5. The LED tube light be viewed directly without optical instruments, the grade is 1M.
6. Do not install and use the LED tube lamp in combustible objects. No matter what the situation is, the tube lamps cannot be covered by heat insulation pads or similar materials.
7. Please do not install the product on high-temperature objects, and do not install directly above the stove, gas and exhaust cylinders to avoid damage.
8. It is forbidden to use it outdoors and in places exposed to rain
Wiring diagram of the LED split t8 tube LED split T5 tube LED T6 tube
Before installing the lamp, please pay attention to distinguish the power supply mode of the lamp, and connect the line according to the inline mode request.

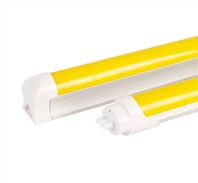
LED tube lamp body installation
If ballast compatible
Connect the power supply Plug in the LED tube light

Note: It is strictly forbidden to install the LED tube before removing the starter and rectifier, otherwise the LED energy-saving tube will be burned out due to the instantaneous start voltage is too high.
If ballast bypass
Remove starter and rectifier Plug in the LED tube light

Note: It is strictly forbidden to install the LED tube before removing the starter and rectifier, otherwise the LED energy-saving tube will be burned out due to the instantaneous start voltage is too high.
Lamp bracket refit wiring diagram
When installing the bracket of the magnetic ballast, as shown in the figure below, you need to remove the starter and ballast, and change the wire connection in the bracket as shown in the figure, and do the insulation treatment.

When installing the bracket of the electronic ballast, as shown in the figure below, you need to remove the starter and ballast, and change the wire connection in the bracket as shown in the figure, and do the insulation treatment.